Showing posts with label how-to. Show all posts

Tuesday, November 29, 2011

How to make a Shoe Cake

When I made the shoe cake, I wasn't intending on making a tutorial.  I was just taking progress photos to help me in case I need to make another shoe cake.  These are camera phone pictures so they're not the best quality but I hope they are still helpful.  Enjoy!

What's needed:
  * pictures of shoe from different angles, better if you have the actual shoe
  * footprint template
  * 9x13 and 4x4 two inch cakes
  * buttercream
  * fondant - white, black, light and dark gray, red
  * paper towel
  * serrated knife (for carving the cake)
  * X-acto knife (for cutting fondant)
  * cutter/embosser (for stitching details)
  * modeling sticks (for holes on sides of shoes)
  * ball tool (for pushing "holes" for the shoe lace)
  * brush (for water to apply fondant on fondant)
  * rolling pin
  * roll and cut mat

1.  Carve the cake.  I took my 9x13 cake and carved 2 footprints from it (bottom two layers of the pic) and stacked them.  The 3rd layer was cut from the 4x4 cake and the top layer is the piece cut from the 2nd layer.

2.  Crumb coat.

3. Cover with white fondant.

4.  Cover top of the back of the shoe with the color of the inside of the shoe.

5.  Cut fondant in the shape of the tongue of the shoe and prop it up with a rolled paper towel.

6.  Add more details (gray outlines in this pic).

7.  Add stitching details using the cutter/embosser.  Shoe lace was made by cutting thin strips of white fondant.  Start with the horizontal first strip close to the front of the shoe.  To do this, use the ball tool to indent a "hole" for the ends of the strip will go and put the ends of the strip in that hole.  Next, put two short strips crossed over inside the gray outline.  Indent holes where the crossed over laces ended and put the next cross of shoe laces.  Keep adding more until you end to where you want the lace to end.

8.  Roll out a rope of fondant in the same color as the inside of the shoe and put it on top of the back of shoe extending to the top of the shoe lace.

9.  Add more details.  In this pic, gray strips of fondant were placed on the back of the shoe for a puffy look.  A loop of black fondant was also added to the top of the back of shoe.

10.  Add more details.  Added white crossover detail and red buckles.

11.  Side view of previous step.

12.  Add more details.  Added stitchign detail, logo and #23.

13.  Add more details.  Added the sole of the shoe using red and dark gray as well as a black strip on the back of the shoe.

14.  View of the other side of the shoe after completing the previous step.

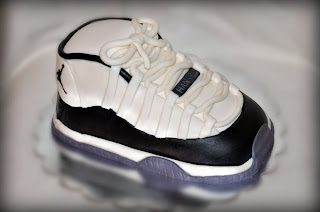
15. Finished cake!

Tuesday, February 22, 2011

Shoe Cake


 A friend requested this cake for her husband.  She had a basketball theme for his birthday and said that he's always wanted a pair or Jordans.

At first, I didn't think I'd be able to make this cake.  It seemed like too many details that I've never done before.  But as my husband always say: "do it one step at a time, easy ones first" and surprisingly, I did it!  I wanted to take step by step photos but I was a bit nervous that I won't enough have time to finish all the details this shoe needed.

Here are the steps I followed in making this cake:
  1. Bake two 9-inch square cakes.
  2. Cut the cakes in half and stack.  One of the pieces I cut a third off.  This give mes 5 layers total.
  3. Fill and ice the cake with chocolate buttercream.
  4. Smooth the buttercream using the Viva paper towel method.
  5. Cover the cake with fondant (I could have skipped this step if plain/white buttercream was used).
  6. Here's the order I placed the details on the shoe:
    • black fondant on the base of the shoe
    • white over the black fondant on the base of the shoe
    • gray over the white fondant on the base of the shoe then used the back of a knife to put lines
    • white fondant at the back of the shoe (area with the Jordan image)
    • white fondant for the sides of the shoe
    • rolled black fondant into a string and placed it on top of the cake towards the back of the shoe
    • rolled white fondant for the shoe lace and placed it on top of the shoe
    • cut white fondant strips for the sides of the shoe
    • place the white fondant strips on the side and tucked the shoe lace under the strip
    • cut a small strip of black fondant and embed the celebrant's name
    • used the pin prick method to place the Jordan image
I wished I carved it some more after seeing the finished cake but I was still happy with the overall outcome of the cake.  This was the first carved cake I made without using any templates after all :)

Happy Birthday Hansel!

Thursday, February 10, 2011

For the TMNT fan...


This Teenage Mutant Ninja Turtles cake made of a 6-inch chocolate cake covered and decorated with fondant. This design is based on this cake.

As a child, I was never good at playing with clay so I wasn't sure if I will be able to make the turtles' faces.  As it turns out, the colors helps a lot to make the decorations identifiable.  Here's how I made the turtle faces:
  1. Start out with a ball of fondant
  2. Shape the face a bit by pressing a finger a bit where the eyes will be to give it somewhat of a face shape
  3. Roll little fondant ropes in the colors of the masks for each turtle.  After rolling, flatten the part that will cover the eyes then attach to the turtle heads.
  4. Make white small fondant balls for the eyes and smaller black fondant balls for the pupil of the eyes.  Shape and flatten the fondant as needed and attached on top of the masks.
  5. Use a sharp tool to mark the smile for each turle.
I don't think I got the exact colors for the masks but the birthday celebrant didn't seem to notice :)  Overall, the cake made for a fun surprise.
  
Happy Birthday Erwin!

Wednesday, February 9, 2011

Mario Cake (and how to make mario's face)


This Mario cake was made for my Godson's birthday.  It was a 6-inch chocolate cake covered and decorated with fondant.  At 3 years old, he loves to play video games and Mario is his favorite character.

When I first decided to make this cake, I was a bit worried because I can't draw to save my life.  Thank God for wax paper!  I used the wax paper to trace the image.  Here are the steps I followed in constructing Mario's face:
  1. Print the face in the size needed for the decoration
  2. Use wax paper to trace the image.  Put the wax paper on the printed image and trace away.
  3. Roll out the fondant in the colors that are needed for the image.
  4. Place the wax paper on top of the rolled fondant and using something sharp (I used a toothpick), trace the image to leave marks on the fondant.
  5. Lift the wax paper and cut the fondant pieces.
  6. After cutting all the fondant pieces needed, now it's time to do a puzzle!
  7. Go back to the original printed image and put the fondant pieces together to match the image.
Making cakes is so much fun for me.  But still, the best part of making cakes is seeing the happy face of the birthday celebrant.

Happy Birthday Evan Jacob!

Thursday, December 2, 2010

How to make a Turtle Cake

I have been learning how to decorate with fondant and it's been so much fun.  The very first cake I made using fondant decorations was a Turtle cake.  This one was a trial cake for 2 turtle cakes that I was going to make for a friend's babies birthdays.

Here are the things I used to create the cake:
* 9x3 contour pan for the body
* mini ball pan for the head
* cupcakes turned upside down for the feet

Here's a step-by-step pictures of how I decorated the cake with fondant:
~covered the body of the turtle with green fondant~

~used round cookie cutters for the yellow spots~

~covered the head (made up of 2 halves from the mini ball pan) with green fondant and attached it to the body~

~covered the feet (made of cupcakes turned upside down) with green fondant and attached it to the body~

~rolled yellow fondant into a rope and attached it around the turtle's body/shell~

~rolled green fondant into little balls for the fingers~

~used the back of a knife to imprint the mouth/smile on the turtle's face~

~used brown M&M's for the turtle's eyes~

Of course, I always tend to forget something.  It turns out, I forgot to add the turtle's tail!  It was totally forgotten that even the two turtles I made for the birthday party didn't have tails!  Not too bad, only one person noticed it :)