Since I got into baking, I've only made chocolate cakes with chocolate buttercream. This is because of the following reasons: (1) I LOVE chocolate, (2) it's what's mostly requested, and (3) when there's no specific request, I figure, who doesn't love chocolate?
I felt safe with chocolate and wanted to concentrate more on making my cakes look pretty. Now that I feel comfortable working with fondant, I feel that I want to go beyond just chocolate cake and icing recipes. So starting today, I am in search of cake and icing recipes and excuses, i mean occasions, to try them out.
What's your favorite cake/icing recipe?
Thursday, March 24, 2011


Monday, March 21, 2011
Cupcake Cake


A cupcake cake for a cupcake themed baby shower. Well, at least a friend and I both brought cupcake themed presents for the party.
The base cake is made from 2 layers of 9-inch round chocolate cake and the cupcake is made from 2 layers of 6-inch round cake both covered and decorated with fondant. Letters and cherry made out of fondant. Cupcake is surrounded with edible pearls and the cake was brushed with pearl dust.
Congratulations Sheryll & Jose!
Wednesday, March 16, 2011
The Gift

A gift for the birthday celebrant!
This gift was made with 4 layers of 4x4 chocolate cake covered and decorated with fondant. Brushed with pearl dust for shimmer and surrounded with edible pearls on the bottom. All edible except for the cake board :)
Happy Birthday Greg!
Friday, March 11, 2011
Spongebob!

When I made the Hello Kitty cake for a dear friend last month, her nephew exclaimed "wow! I want a Spongebob cake!" So for his birthday, I surprised him with this cake :)
A new discovery for me... for brown and black fondant, use chocolate fondant. I use marshmallow fondant (MMF) in all my cakes so it's really hard to get a really dark color without messing up the mmf. It turns out, all I need to do is add some cocoa powder to my mmf and viola! Dark brown fondant!
Because I loved the chocolate flavor on my mmf, I will be trying to make the mmf recipe with white chocolate and see how that works. I just love love love chocolate!
Happy Birthday Jeremiah!
Thursday, March 10, 2011
Speed Skate


The speed skate was made from a 9x13 chocolate cake, cut, stacked and carved. All the decorations are made from fondant. The block is also made of chocolate cake, covered and decorated with fondant. The base cake is a two layer 9x13 chocolate cake.
Although I have made a shoe cake before, this one presented an extra challenge. I was determined to have the skate stand on its blade. At first, it seemed impossible. Then after searching online on forums and blogs, one suggestion that stuck out was to use dowels. One thing with that suggestion, I didn't think it would completely support the shoe. I was afraid that the shoe will tilt to the side and fall over. While chatting with a friend, we came up with a solution. A block to put under the shoe to support its side! Genius! It totally worked.
I hope the birthday boy enjoyed this cake as much as I enjoyed making it :)
Happy Birthday William!
Monday, February 28, 2011
Pretty Ladies!
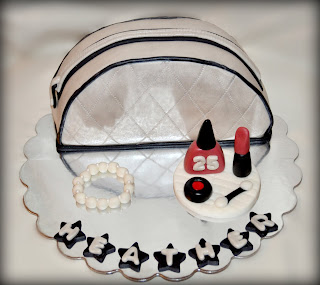
A make-up kit cake for the beautiful ladies! This cake was requested by a friend for her sister's 25th birthday. Her sister was a hair and make-up artist, making this make-up kit cake perfect for her. It was a chocolate cake with chocolate icing covered with fondant. All the decorations, make-up, bracelet and name were made from fondant. This design is based on this cake.
The cake was made using two 9-inch round cakes. A little portion of the cake was cut off for the bottom of the purse. For every cake that I make, I seem to always learn a lesson. For this one, I think using two square cakes, cutting them in half, stacking them and then carving the sides to form the shape would have held up better. Using the round cake made the cake tilt a bit. Not too obvious in the picture since it was tilting backwards. Thankfully, they still loved the cake! I've been told that I am too harsh on myself when it comes to the cakes I make. I say there's always room for improvement!
Happy Birthday Heather!
Tuesday, February 22, 2011
Shoe Cake
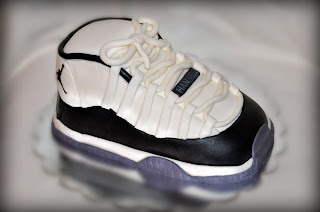
A friend requested this cake for her husband. She had a basketball theme for his birthday and said that he's always wanted a pair or Jordans.
At first, I didn't think I'd be able to make this cake. It seemed like too many details that I've never done before. But as my husband always say: "do it one step at a time, easy ones first" and surprisingly, I did it! I wanted to take step by step photos but I was a bit nervous that I won't enough have time to finish all the details this shoe needed.
Here are the steps I followed in making this cake:
- Bake two 9-inch square cakes.
- Cut the cakes in half and stack. One of the pieces I cut a third off. This give mes 5 layers total.
- Fill and ice the cake with chocolate buttercream.
- Smooth the buttercream using the Viva paper towel method.
- Cover the cake with fondant (I could have skipped this step if plain/white buttercream was used).
- Here's the order I placed the details on the shoe:
- black fondant on the base of the shoe
- white over the black fondant on the base of the shoe
- gray over the white fondant on the base of the shoe then used the back of a knife to put lines
- white fondant at the back of the shoe (area with the Jordan image)
- white fondant for the sides of the shoe
- rolled black fondant into a string and placed it on top of the cake towards the back of the shoe
- rolled white fondant for the shoe lace and placed it on top of the shoe
- cut white fondant strips for the sides of the shoe
- place the white fondant strips on the side and tucked the shoe lace under the strip
- cut a small strip of black fondant and embed the celebrant's name
- used the pin prick method to place the Jordan image
I wished I carved it some more after seeing the finished cake but I was still happy with the overall outcome of the cake. This was the first carved cake I made without using any templates after all :)
Happy Birthday Hansel!
Subscribe to:
Posts (Atom)